In this article
- Key Takeaways
- Why Hang a Gallery Wall Without Nails?
- Weigh Every Frame First
- The Command Strip Formula
- When a Frame Is Too Heavy for Strips
- Plan the Layout Before You Stick Anything
- Prep the Wall So the Bond Holds
- Step-by-Step: The Damage-Free Hanging Formula
- Common Mistakes That Make Frames Slide or Fall
- Expert Tips for a Gallery Wall That Stays Put
- Frequently Asked Questions
- Your Deposit-Safe Wall, Ready to Enjoy
How to Hang a Heavy Gallery Wall Without Nails: The Step-by-Step Command Strip Formula
Hang a heavy gallery wall without nails using a simple Command strip formula. A renter-safe, step-by-step method for damage-free frames that stay put.


· 12 min read
You can hang a gallery wall without nails, and you can do it so the frames still sit straight a year from now. The trick is not luck or one magic product. It is a repeatable formula: weigh each frame, match it to the right adhesive strips, prep the wall, and press in the correct order. Renters lose deposits over nail holes every month, and heavy frames are the ones most likely to slide or drop when they go up in a hurry. This guide gives you the exact method for damage-free hanging, including what to do when a frame feels too heavy for sticky strips.
Key Takeaways
- Weigh every frame before you buy a single strip. The number on the scale drives your whole plan.
- Match the total strip capacity to the frame weight, then add a safety margin. Never eyeball it.
- Wall prep decides success. Clean, dry, fully cured paint holds. Dusty or freshly painted walls do not.
- Press firmly and wait. Most failures come from rushing the bond, not from weak strips.
- Plan the layout on the floor or on paper first, so no strip lands in the wrong spot.
- Removal is part of the method. Pull the tab straight down and slow to protect the paint.
Why Hang a Gallery Wall Without Nails?
The short answer: because holes cost money and time in a rental, and a nail-free wall can look just as polished. A gallery wall without nails skips the spackle, the touch-up paint, and the awkward move-out inspection. You get the art you want now, and you take it down clean later.
Nails also lock you in. Once you hammer, moving a frame two inches means a new hole and an old one to fill. Adhesive strips let you adjust, which matters a lot on a busy gallery wall where spacing is everything.
There is a comfort factor too. If you rent, you already know the quiet stress of drilling into someone else's wall. A damage-free system removes that. It pairs well with other renter-friendly upgrades you can take with you, so your whole place feels like yours without a single permanent change.
Weigh Every Frame First
Weight is the foundation of this entire method, so start there. Put each framed piece on a kitchen scale or hang it from a small luggage scale. Write the weight on a sticky note and press it to the back of the frame. Do this for every piece before you plan anything else.
Why so strict? Because adhesive strips are sold by weight rating, and the whole formula depends on knowing your real numbers rather than a guess. A large wood frame with glass can weigh several times more than a small print, even when they look similar on the wall.
Sort your frames into three rough groups as you weigh: light, medium, and heavy. You will treat each group a little differently in the steps below. Keep the heaviest pieces flagged, because those are the ones that need the most care and the widest safety margin.
The Command Strip Formula
Here is the core rule: add up the weight capacity of the strips you plan to use on one frame, and make sure that total comfortably beats the frame's actual weight. The exact rating is printed on the pack, so read it and trust it rather than a number you remember from a video.
Use velcro-style picture-hanging strips for framed art, not the general-purpose hooks. Picture-hanging strips come in interlocking pairs, they let you level a frame after it is up, and they release cleanly when you pull the tab. That combination is what makes them right for a gallery wall.
To build in a margin, follow three habits:
- Round up, never down. If a frame sits near the top of a strip pair's rating, move up a size or add another pair.
- Spread the load. Place strips at the top corners of the frame so the weight hangs from a wide base, not one crowded spot.
- Add a pair for glass. Glass and solid wood are heavier than they look, so give those frames one extra pair beyond what the math suggests.
One honest note on numbers: strip ratings vary by brand and size, and they change over time, so I am not going to quote a figure that might be wrong for your pack. Weigh your frame, read the box, and match them with room to spare. That habit is the formula.
When a Frame Is Too Heavy for Strips
Some frames simply outweigh what adhesive strips can safely hold. When you hit that limit, do not stack strips endlessly and hope. Switch tactics instead.
The easiest workaround is a picture ledge that itself mounts with heavy-duty strips or a tension-based system. You lean the heavy piece on the ledge rather than sticking the frame to the wall. The ledge carries the load low and wide, and you can swap art whenever you like.
You can also lighten the frame. Swap a glass front for lightweight acrylic, or move a heavy print into a slimmer frame. If the piece is precious and genuinely heavy, that is one of the rare cases where a proper wall anchor is worth a conversation with your landlord. Deciding when to adapt and when to invest is the same judgment call covered in when a DIY fix beats buying new.
Plan the Layout Before You Stick Anything
Adhesive strips forgive small moves, but they do not forgive a whole redesign, so plan first. Lay all your frames on the floor and arrange them until the grouping feels balanced. Start with your largest or boldest piece as the anchor, then build outward around it.
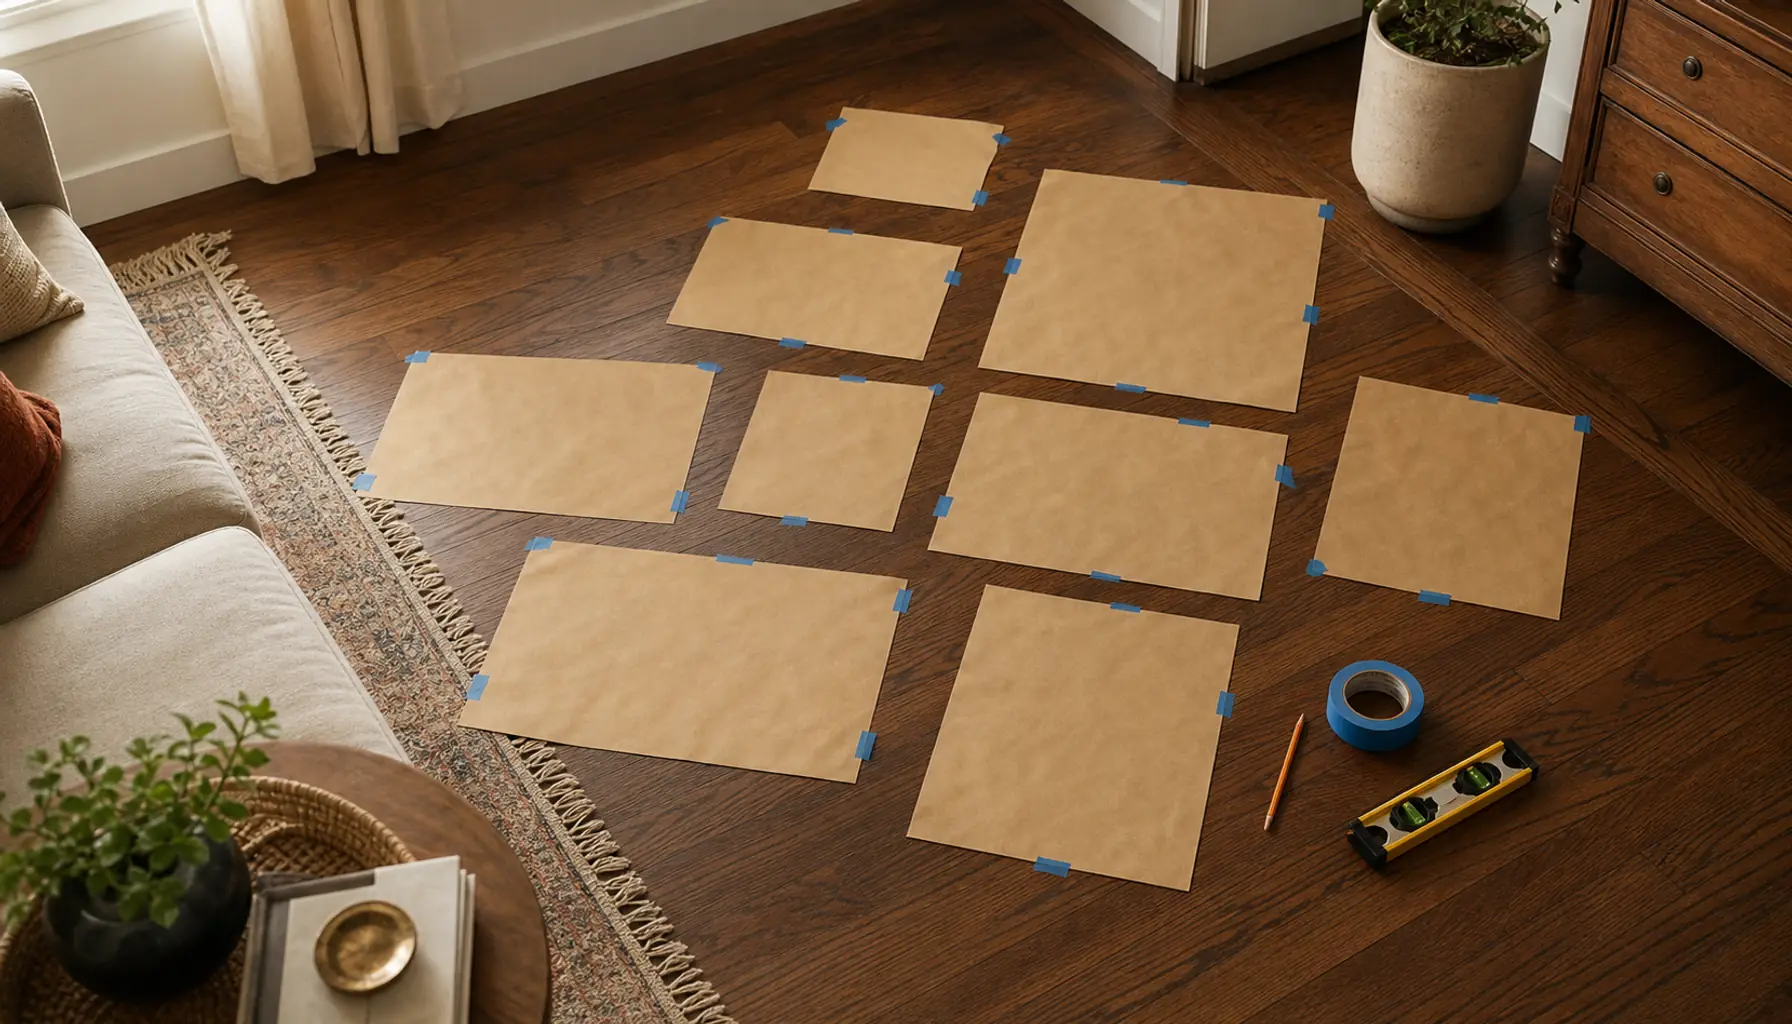
Trace each frame onto kraft paper or newspaper, cut out the shapes, and tape those templates to the wall with painter's tape. Step back and live with the arrangement for a day. Move the paper, not the frames. This is the same order-of-operations idea behind planning a gallery wall without the guesswork, and it saves you from sticky mistakes.
Keep your spacing consistent, usually a couple of inches between frames, so the group reads as one piece rather than scattered art. If your colors feel busy, calm them down using the logic in choosing a palette for a small room.
Prep the Wall So the Bond Holds
Adhesive is only as strong as the surface under it, so treat prep as a real step, not a formality. Wipe each spot with rubbing alcohol on a clean cloth, then let it dry fully. Skip household sprays, because many leave an oily film that quietly weakens the bond.
Paint matters just as much. Adhesive grabs best on smooth, fully cured surfaces. Fresh paint can take weeks to cure, and flat or matte finishes release more easily than satin or semi-gloss. If your walls were painted recently, wait, or test one strip in a hidden corner first. The same surface rules apply to peel-and-stick projects in a rental, so it is worth learning them once.
Textured walls are the hard case. Heavy orange-peel or knockdown texture only touches the high points of a strip, which cuts holding power. On rough walls, lean toward a ledge or lightweight frames rather than trusting strips with a heavy piece.
Step-by-Step: The Damage-Free Hanging Formula
Step 1: Gather and Weigh
Collect your frames, picture-hanging strips in the right sizes, rubbing alcohol, a cloth, a level, a pencil, and painter's tape. Weigh every frame and note the number on the back. You cannot pick strips correctly until this is done.
Step 2: Map the Layout
Arrange the frames on the floor, choose your anchor piece, and set even spacing. Cut paper templates and tape them to the wall. Adjust until the grouping looks right from across the room.
Step 3: Clean the Wall and Frame Backs
Wipe each template spot on the wall with alcohol and let it dry. Clean the back corners of each frame too, because dust on the frame is just as likely to break the bond as dust on the wall.
Step 4: Apply the Strips to the Frame
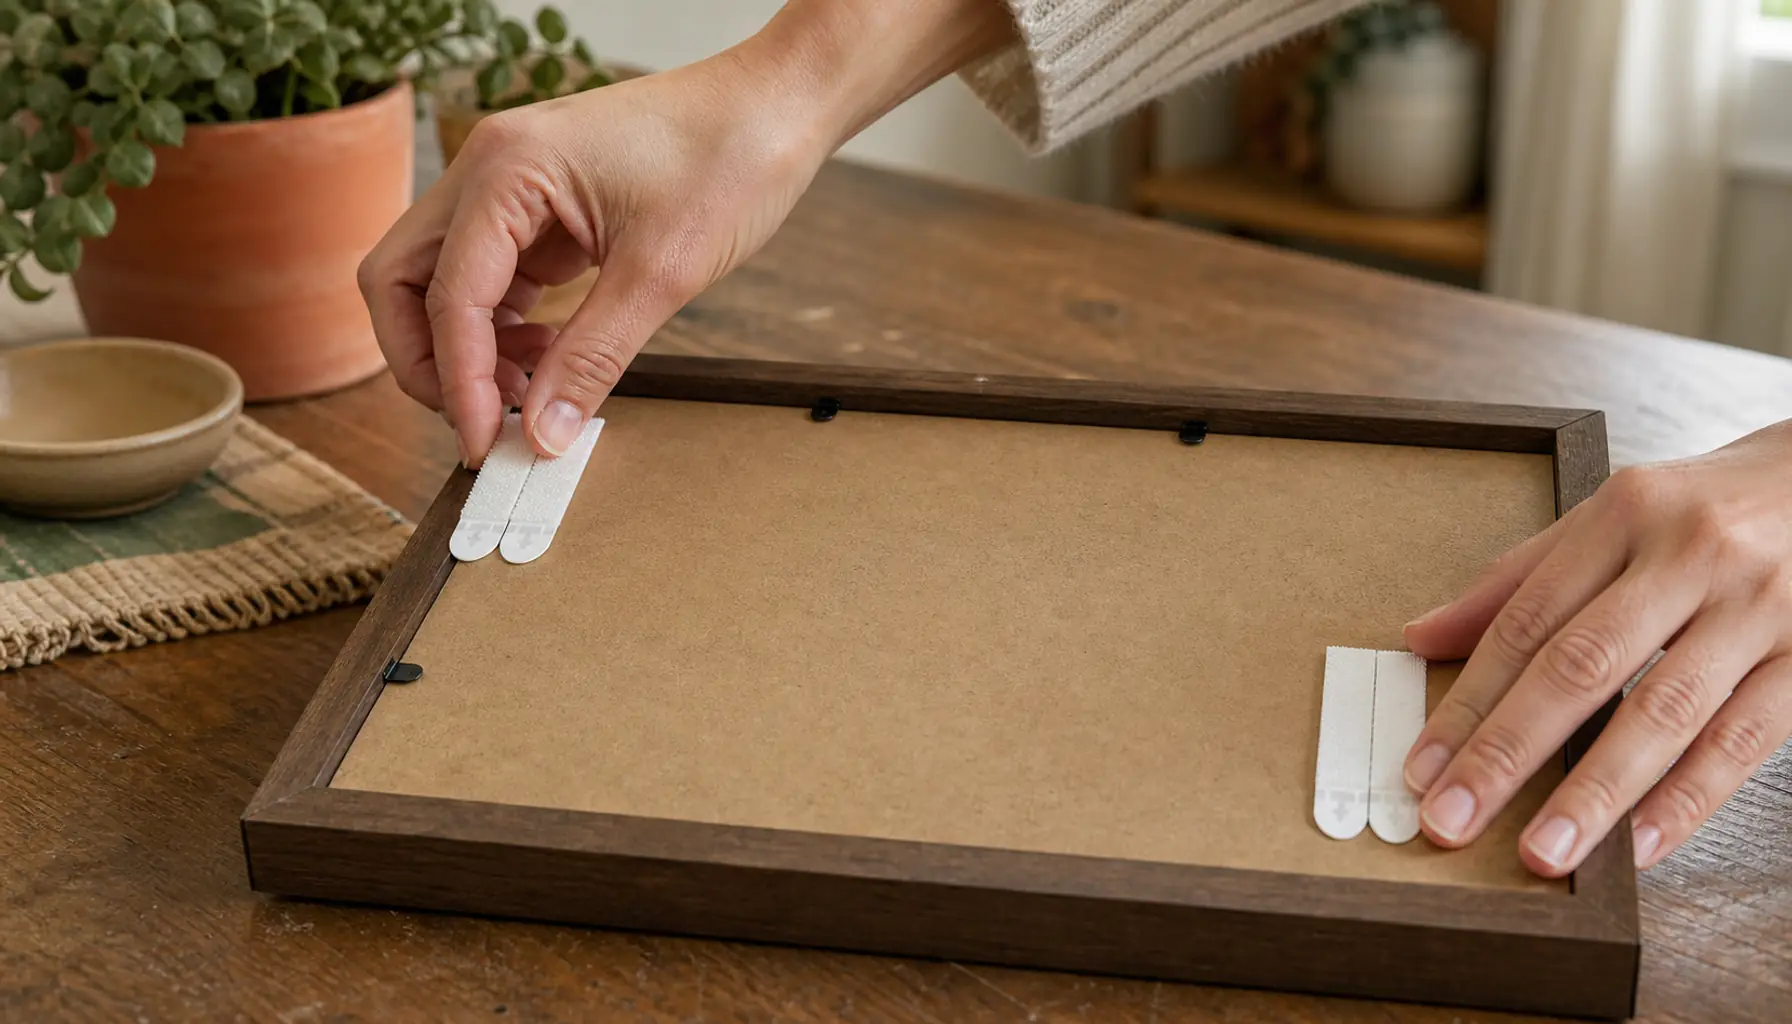
Snap the strip pairs together, then peel the backing and press one side to each top corner of the frame. Push hard for several seconds so the adhesive sets against the frame first. For wide or heavy frames, add a pair along the bottom edge to stop the frame from tilting away from the wall.
Step 5: Set the Anchor Frame
Peel the wall-side backing and place your anchor frame first, matching its paper template. Use the level before you commit any pressure. The anchor sets the visual center, so getting it straight makes every other frame easier.
Step 6: Press, Hold, and Wait
Press the whole frame firmly against the wall for at least 30 seconds, focusing on each corner. Then take the frame back off, leaving the wall-side strips in place, and press those strips again for another 30 seconds. This double-press is the single biggest reason frames stay up. Now wait an hour before you rehang, so the adhesive can build its full grip.
Step 7: Level and Fill In
Rehang the anchor, check it with the level, and adjust while the velcro still lets you nudge it. Work outward, hanging one frame at a time and using your paper spacing as a guide. Stand back often to keep the whole group balanced.
Common Mistakes That Make Frames Slide or Fall
Most gallery wall failures trace back to a few avoidable habits. Watch for these.
- Skipping the weigh-in. Guessing the weight leads to underrated strips and slow, creeping slides. Weigh first, every time.
- Rushing the bond. Letting go after five seconds is the top cause of a 2 a.m. crash. Press long, then wait the full hour.
- Dirty or fresh surfaces. Dust, cleaner residue, and uncured paint all cut holding power. Prep is not optional.
- Crowding strips in one spot. Stacking strips close together does not equal spreading the load. Use the corners.
- Ignoring the frame back. A glossy or dusty frame back releases the strip before the wall does. Clean both sides.
Expert Tips for a Gallery Wall That Stays Put
A few small moves separate a wall that lasts from one you keep re-hanging.
Buy more strips than the math suggests and keep the spares. A single extra pair added to a borderline frame is cheap insurance, and leftover strips make future swaps painless.
Hang heavy frames lower in the arrangement when you can. Weight near the bottom of a grouping is more stable and easier to support, and it also reads as more grounded to the eye. If you enjoy this kind of quiet balancing, the same instinct shows up in styling open shelves without clutter.
Finally, give the whole wall a gentle press-check once a month for the first few months. Ten seconds of pressure on each frame keeps the bond fresh. A nail-free wall is a small system, and like any budget refresh worth keeping, it rewards a little upkeep.
Frequently Asked Questions
How much weight can adhesive strips actually hold?
It depends on the brand and the strip size, and the real number is printed on the pack. Rather than trust a figure from memory, weigh your frame and read the box, then choose strips whose combined rating clearly beats that weight. Add a pair for glass or solid wood, since those are heavier than they look.
Will Command strips damage my paint when I remove them?
Used correctly, they are designed to come off cleanly. Pull the release tab slowly and straight down along the wall, not outward. Rushing or yanking at an angle is what lifts paint. On flat or freshly painted walls the risk is higher, so test one strip in a hidden spot first.
Can I reposition a frame after it is stuck?
Velcro-style picture-hanging strips let you lift the frame off and rehang it to fine-tune the level, which is exactly why they beat general hooks for gallery walls. Larger moves, though, mean peeling the wall-side strips and starting that spot over, so plan the layout with paper templates before you commit.
Do adhesive strips work on textured walls?
Only up to a point. Heavy texture lets the strip touch just the high spots, which lowers holding power. On rough walls, keep frames light or switch to a picture ledge for anything heavy. Always run a small test before trusting a valued piece.
How long should I wait before letting go of the frame?
Press each frame for at least 30 seconds, then remove it and press the wall-side strips again for another 30 seconds. Wait a full hour before rehanging so the adhesive can reach a strong grip. This patience is the difference between a wall that holds and one that slides.
What is the heaviest frame I can hang without nails?
There is a ceiling, and it varies by product. When a frame's weight passes what a reasonable number of strips can safely carry, stop adding strips and switch to a picture ledge or a lighter frame instead. For a heavy, precious piece, a proper anchor may be the honest answer.
Can I reuse the strips after taking frames down?
No. Once a strip has been stretched off the wall, its adhesive is spent, so use a fresh pair each time you rehang. The velcro connectors can be reused, but the sticky strips themselves are single use. Keeping spares on hand makes this easy.
Your Deposit-Safe Wall, Ready to Enjoy
A gallery wall without nails comes down to one honest formula: weigh each frame, match it to strips with room to spare, prep the surface, and press in the right order with real patience. Do that, and heavy frames will stay put without a single hole in the wall.

Start small if the whole wall feels like a lot. Hang the anchor and two frames this weekend, then build out once you trust the method. And when you are ready to plan the wider room around your new wall, map the numbers first with the Decor Budget Calculator so the rest of the refresh stays on budget.